Saturday, February 13, 2010

SUNROOF MAINTENANCE


In this section, sunroof maintenance is illustrated so that the owner gets to enjoy the sunroof for many years to come. Proper and scheduled maintenance does make a BIG difference in prolonging the life of the sunroof. Of course, the sunroof can always be rebuilt if it fails to operate, but that is a job that requires an expert not easily found, and fees that is not usually expected. So, it pays to take care of the sunroof now and then.


The photo above shows a new sunroof with attached plastic wrap during installation to prevent scratches on the deflector panel. It has to be removed, or later use will cause the plastic wrap to come loose and may get entangled in the mechanisms.


This is the front mating portion of the sunroof to the chasis It is imperative that this portion is kept clean and free from rust.


A top view of my favorite ride, with the sunroof in a full retracted position.


Notice the accumulation of dirt after hours of fun with the open top. Dirt such as these are often acidic in nature and will eat into the water drain pan if left in a prolonged state.


After carefull cleaning, it looks good as new. When the sunroof was first rebuilt in 2003, I patched up certain spots that were rusted with fibre glass, and painted it over with the special yellow anti-rust paint from Hammerite.


This is a close-up view of the front drain hole located below the sliding mechanism. There will be a total of 4 drain holes for draining water from the sunroof water catchment pan, 2 in front, and 2 at the rear of the pan that is hidden below the chasis roof. This is due to the car body roof that is curved with the apex at the center, and sliding down towards the rear of the car.


Scheduled maintenance should include pouring of soap water into the water catchment pan of the sunroof. This is meant for neutralizing the build up of acidic particles in the drain system, as well as to clear any minor blockages. Of course, this method can be used similarly to check if the drain system is choked up. If it is, the use of compressed air pumped into the drain hole will be the last resort, as the rubber hose may burst if the blockage is serious. Tee soap water should be poured on both front left and right sides, as the drain pan is curved with the apex in the center.


To check the rear drainage system, pour the soap water towards the rear left and right of the sunroof, so as to allow the soap water to flow backwards toward the rear of the water catchment pan.


After each pouring (each of the 4 drain holes), check to see if the soap water flows out at the bottom of the car, at the body silts. If the flow is not progressive, use a mild steel wire to clear any accumulated dirt at the body silt openings. There should be four openings, 2 at each sides of the car. If the flow shows a clean flow of soap water, the job is done right.


Cleaning of the sides of the sunroof opening where the glass panel slides past is imperative to ensure a good seal. Accumulation of dirt will increase friction and reduce the lifespan of the rubber moulding, to the extent of tearing it apart on extreme cases of friction.


The front edge takes a good dose of dirt as it is at the front edge.


Note the accumulation of dirt at the corners.


This is how I do it, with a cottom cloth that is soaked wet with soap water and wrung dry. The soap will neutralize any acidic built up, as well as function as a lubricant for the sliding action of the rubber / furry contact surfaces.


The rear of the sunroof is cleaned by reaching into the cavity to ensure no particles stuck at the sealing surfaces. If there are, water & wind will be leaked into the cabin.


Another shot at the front edge furry sealing surface, after cleaning is done.
Proper maintenance of the sunroof ensures a long lasting usage without any issues. As the sunroof is located at the top of the car, exposure to the sun will accelerate the deterioration, so care is certainly required. Use of "Armour All", or any other rubber protectant is recommended. If there are any details not addressed here, leave a comment, and I will see to it.


And to all chinese viewers ;
Gong Xi Fatt Chai, Wan Sze Ru I, Welcome to the year of the TIGER !

Friday, February 12, 2010

SUNROOF ALIGNMENT : PART 2

This part covers newer designs that incorporate lightweight parts, with advance mechanisms for "Tilt" and "Retract".


The emphasis on water and wind noise leakage I believe, should be at the rear edge, where the tilt and retract actions occur. Since the tail end of the glass panel has to perform 2 functions, therefore the height and gap setting is crucial to prevent leakages. The edges on the glass panel are a furry type of sealing surface mounted on a rubber moulding aroung the glass panel. This type of sealing surface gives good overall dirt absorbtion and resistance to water & wind intrusion into the cabin. Of course, such set-up requires some maintenance (covered under Sunroof Maintenance section), or the sealing ability is compromised.


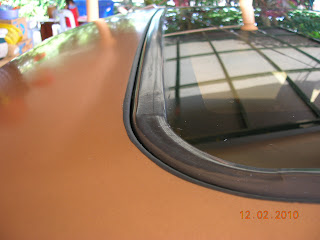
This is a separate photo shot taken as close-up, showing the gap and height alignment that I did after the new car was taken from the dealer's lot. Initially, the glass panel height was slightly below the chasis roof line, which puts a risk for water leak (allow me to elaborate later). This setting is tested to >110km/h in the heavy rains ( I will not disclose the actual speed, just in case the traffic police is reading this blog ). For safety purposes, use Rain-X on the windscreens to deflect the water to ensure a clear view of the roads, and ensure at least 80% tire tread if such need-for-speed arise. Also note the curvature of the roof line, matched by the glass panel, with the apex at the center.


Another photo shoot of the entire rear glass panel gapping.


This is a view of the sides gapping. The gap is largely determined by the chasis and glass panel fabrication dimensions. Alignment is only limited to ensuring a proper centering during the bolting, or in some cases, the centering alignment is totally flexible with no alignment screws / bolts.


A view of the front gapping and height. As mentioned earlier, The glass panel rubber moulding height must be at least the same height or higher than that of the roof line. This is to ensure water flow AROUND the sunroof rather than over or accumulating on it (if the glass panel is below the roof line). Secondly, the furry seals on the rubber moulding is below the surface, and need to come in contact with the sealing surface of the chasis cavity. Lowering the height of the glass panel thus increases the risk of water accumulation at the gaps and leaking into the water drip pan below. Coupled with speed and stop-go-movement, it will result in spilled water into the cabin. There are also some arguments on "drainage" piping issues that I will address in the "Sunroof Maintenance" section, as the drainage issues can be easily checked and be verified.


This photo shows the side view of the "Tilt" and "Retract" mechanisms, that can be readily seen without removing any cover panels. Pictured is the "rest" position of the sunroof (closed position). Note the round stub close to the spotlighted area. This is the index for raising the sunroof for tilt and lowering the sunroof for retraction mode.


Pictured is the round stub at the "retraction" mode. This position of the stub lowers the glass panel for retraction into the cavity between the chasis roof and headliner.


Pictured is the sunroof at the "Tilt" mode, with the round stub and arm at the raised position (spotlighted area). Retraction mode will be in the opposite direction movement of the round stub.


This is the exterior view of the "Tilt" mode so there is no confusion as to what it does. OK so far ??


Pictured is a view of the mechanism. Note the rear adjustment bolt (in blue) that is meant for final stop height for the glass panel rear end (driver side).


A more detailed view of the same bolt from outside of the car, as we will be focusing more on the details of glass panel height adjustment.


In the above illustration, all 3 adjustment bolts are shown (on a single side). The rear screw, as introduced earlier, enables a final stop height adjustment on the respective sides (passenger and driver sides). Double-click on the image to enlarge to full screen for a clearer view if you have broadband access. Similarly, the front two screws, allows final stop height adjustments for the respective sides at the front end of the glass panel. It is therefore commonsense that the adjustments are to be done at the final stop position, with a #2 philips screwdriver (with powergrip), or a racheting drive for better torque. These screws are to be tight as they will be subjected to wind force. As the hinges are rigidly attached to the glass panel frame, the only way to adjust for side alignment gapping is probably to bend the hinges .... but this is not recommended. Do investigate on and eliminate on other possible causes for lateral misalignment before resorting to this brute force method.

Finally, if you do come across any issues that is not covered in this blog, do post me an enquiry. I will do my best to assist :-)

SUNROOF : PART 1


I got this topic up for some time (in 2009), but did not get to publish due to time constraints. It is quite comprehensive, as the sunroof is a unique and electro-mechanical device, having designed to be fitted into a slim space below the chasis top and above the headliner.

As in the pic., with the subroof open, so will the SKY or MOONLIGHT (tips for the young and restless at heart).


The enjoyment however, is quite satisfactory. I spent 3 months rebuilding this sunroof on the Honda Prelude. The mechanisms are basically similar among all the sunroofs, but the materials are not. The glass on the Prelude is heavy duty tempered, with stainless steel frame (photos of the underside later).


Lots of stainless steel was used, compared with newer models, where plastics are subsituted. This part (Part 1) will be more applicable for older sunroofs, or upscale current models that emphasize on quality & durability. Majority of sliding sunroofs utilize a cable or worm screw to actuate the opening and closing of the glass top.


It is VERY IMPORTANT to check and align the gaps around the rubber edge of the sunroof. With big gaps, wind noise, rain water will get into the cabin and spoil all the fun. Think about water dripping into your co-driver's lap ....... or shall I say companion's lap ? Imagine running at 140km/h in the rain. The wind force will sneak in some water, but small amounts is OK, since all sunroofs come with a drip pan (later in photo) that capture stray water drips, but not water sprays occuring at high speeds. As the front is the leading edge, proper alignment of the final stop must be made to ensure a tight fit or water will find its way in on the high speed runs during wet weather. "Whistling" may also occur if there is a gap on this leading edge.


This is a photo of the rear gapping of the sunroof. The drip pan covers from the front to back, which is 2x the length of the glass panel. It cover the total width of the sunroof opening as well. The surface of the chasis roof is slighly convex, with the peak at the centerline of the car. As such, the glass panel will also curve to match the profile. The height of the rubber moulding rise will depend on the design of individual sunroof sealing pattern (edge-to-edge locking pattern).


Looking at the bottom, there is an aesthetic cover that hides all the alignment bolts and mechanisms. The cover may be clipped in position, or screwed, or in combination.


In this example, there is a covered cap for a screw.


Removing the cover reveals a philips screw.


At the rear of the glass panel, when the cover is removed, it reveals two mounting nuts. These nuts enables glass panel height and sideways centering adjustments. Height adjustment is done by looking at the protrusion at or above the chasis roof. Certain feel for "tightness" is required, to ensure a good seal between the rubber moulding and the chasis roof. Glass panel centering is done when all the nuts are in place but loosened, and with sufficient degree of freedom, and the hinges at its natural upright position.


This is the front portion of the glass panel. It also enables both height and centering adjustments. Notice the shims above the bolt plate. A more detailed photo is below.


The shims above the bolting plate enables a fine alignment of the final resting height of the glass panel when it comes to a full stop (at closed position).


Looking from the top with the sunroof open, a rail mounting nut is visible. Since there is a certain degree of flexibility in the centering mechanism of the (usually spring loaded), adjustment of the rail mountings is not required. If the hinges cannot be set 90 degrees upright in the 3rd previous illlustration, adjustments on the rail mountings may be necessary. As mentioned before, the sunroof water drip pan is painted with special anti-rust yellow paint. The glass panel rail mountings are mounted on the water drip pan. Therefore, any adjustments to the rail mountings must be done after removing the water drip pan from the car (aka BIG JOB). Unless the car has been in an accident, rail mounting adjustments are not necessary as expained in the beginning of this paragraph.


The back stop is usually located at the rear of the final stop position of the glass panel. Note the long rectangular protective plastic cover and the ramp at the picture left bottom.


Removing the trim reveals the adjustments for the rear end stop bump. As this is a sliding sunroof, the rear has to come down first before retracted into the cavity below the chasis roof. This stop determines the moment of upside movement in the final stop position (closed
position).


A more detailed view. Moving the stop to the left will raise the rear glass panel earlier and higher. Moving to the right will lower the final elevation of the glass panel rear end on the final stop position.


Pictured is the sunroof panel in opening (or closing ), or in retraction to the underside of the chasis roof. The stopper as described earlier, will determine the final stop height of the rear glass panel at the respective sides (driver / passenger sides).


Post Notes
What is not picture in this illustrations is the sunroof motor, which is hidden above the headliner. It is basically a DC motor, but with friction clutch. It will only be accessible after removing the entire headliner. Unfortunately, when rebuilding it, I did not capture the photos. Maybe sometime in the future, or is there is anyone willing to sponsor the project ?


Saturday, January 9, 2010

Toyota Camry ACV30 Headlamp Replacement


There seems to be a trend for these headlamps to deteriorate. This is how it looks like after 4/5 years of usage. Looking at the deterioration, it appears to be heat related on the areas immediate to the main beam. As the exact cause of the deterioration is not the subject of this short discussion, I leave it to the readers to speculate.


This was the photo on the same side, after the headlamp assy. was replaced. Looks good, like new, at least for the next 4 years.


This is a close-up shot of the model of the headlamp, made in Thailand. I got an exact replacement unit, also from the same source. Since this is not a car for the average Malaysian, I guess RM500/= for each headlamp every 4 years is not too much for someone with a deep pocket.


I took a photo to record the alignment of the bumper to the fender prior to dis-assembly to ensure a quality finish which I will explain later.


This is how it looks like after the headlamp has been removed. Noticed the bumper is still on. As with most experienced mechanic advice : "If it is not necessary to remove, don't remove. " Sounds good to me, and I like that approach.

Notice the newspapers at the bottom. That is to protect the insertion of the new headlamp from sharp points on the chasis.


This is the critical point to watch for, as the sides will determine the quality of finish. The reason is due to small margin of error on this joint. The ACV30 comes with a "smiley" headlamp, and that must be preserved at all cost. Lose that smile, and we're in trouble. Good to note that I have taken a photo prior to dis-assembly, to note the original alignment (slide 4).


The sides may be lowered and spread gently when all the bolts have been released. Looks easier than done .... and it is. Some experience is required, or the smile will be lost.


This is the finish, with the gaps between the headlamp to bumper and to fender at a constant. If the bumper or fender has been damaged and repaired, such a gap is not possible. The headlamp comes with a rubber seal at the edges to form a flush finish with the bodywork.

Good point to note, when shopping for a used Camry. Check all the body gaps. If they are not consistent, most likely it is a lemon. This is a very sturdy car with a strong chasis. Given it is a Toyota, it is very unlikely that any inconsistent body gapping is a factory defect.