Recently, I decided to service my twin carb., due to unstable idling and poor response at high speeds (>110km/h). What the Prelude can do, I leave it to your imagination. A light car with low suspension riding on 4 wheel independent wishbone suspension (front) and trailing arm (rear). Not to mention the arresting 4 wheel disc brakes that can pull back all the crazy moves in a split second.

Pictured are the twin carbs, with the bottom exposed after removing the bottom cover. The white plastic rectangulars are the floats, which needs to be calibrated ... say every 2 years. My calibration was a little lean last time, so I took the opportunity to correct it today. Notice the 3 peaks which are the intakes for the respective jets : 1-Main Jet (top), 2-Slow running/Idling Jet (left), 3- Load Compensating Jet (bottom). The rubber couplings lead to the intake manifold. The initial set-up was meant for California emission specs, but I simplified the features to enhance the performance.

The first step is always to check for the float jet, which comes with a small filter for particles. This filter can only filter coarse particles. Fine particles can still sneak past this and cause havoc to the idling system if unchecked. Ever seen a car idling rough, engine dead at traffic stops, or RPM tuned to 2000 for "idling" ? That is what I meant. A quick blow with a WD-40 will clear this filter, or soak and agitate in kerosene if there are particles lodged.

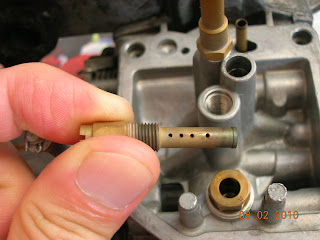
This is the main jet, with holes drilled for air mixture. The main needle of the metering valve goes into this jet body (not pictured). Blockage on this jet is rare, as the hole is large.

Pictured from left are the load compensating jet, idling mixture adjuster needle, slow and idle running jet, idle jet (goes directly to the idling mixture adjuster needle). These are very fine hole jets that must be checked for blockage / partial blockage. As usual, just spray WD-40 into the holes towards the reverse flow end to clear any blockage or check passage way.

The WD-40 method is clearly shown as above, to check or clear internal passage ways for individual circuits (main, slow, idling, load compensation). Acceleration circuit may also be checked using the same method. When spraying into the internal circuit, the throttle must be fully open (full throttle) to observe the flow into the intake passage ways. If the flow is good, job is done

This is a view of the intake passage way, with the idling and slow running holes at the top of the passage way. Double click on the photo to have a clearer view of the idling (1 hole) and slow running holes (3 holes). Squirting WD-40 from the jets will result in output flow from these holes.

The jets have been cleaned and re-assembled, with the floats height calibrated. The mounting surfaces have to be meticulously clean before the float cover is installed or there will be leaks.

The float cover is then cleaned next, and the rubber gasket checked for integrity, flexibility, and tear. No particles is allowed. Cleaning using WD-40 or any other spray lubricant is recommended.

This is the bottom view of the float cover, with a cavity for the load compensating valve. Details later .......

The float cover is mounted, showing the load compensating jet protruding out.

A rubber diaphram is then mounted over the load compensating jet for activation during high load running (uphill, overtaking, high speed runs, etc).
These illustrations are on the bottom-half servicing, and will be complemented with the top-half servicing in the future. The type of carburettor illustrated here is basically a constant velocity carb., meant to improve the torque and power for high performance engines.


