After numerous blogs on technical maintenance, I think a less serious blog would be appropriate, considering that life is not all work. What is the use of maintaining a car in tip-top shape if it is not meant for travelling ? How about travelling to distance land ...... and into the Jurassic era in Kalasin, Thailand.
On the way to the Korat plateou, where the ancient land lies, we have to cross a mountain range. The Citra took all that in a good stride, considering a fully loaded car with 3 adults, 3 children, luggage and gifts. Not to worry as there are always scenic roadside stops to entertain with good food. With 4000+ km, the Citra managed 13km/litre on the average. Consumption is closely monitored as petrol is RM3.10 per litre in Thailand during this period.
Our first stop - Phu Kum Khao excavation site, where an almost complete dinasour fossil was found. The stone tablet leads to the entrance of the complex that houses the excavation site.
Inside the complex, the remains of the sauropod lies asleep. Reminds me of "Aliens"
This blog is dedicated to car DIY's, who spends untold time, energy, and of course - $$$, to find the pleasure of building a ride, knowing the right thing has been done "under the hood". For the other world of car owners, who cannot tell which way to turn a nut, this blog is meant as an information sharing. No offense please ! Finally, to promote my friendly home-service autoworkshop at Simpang Ampat, Penang.
Thursday, September 23, 2010
Friday, September 17, 2010
Naza Citra Timing Belt Re-tension
After 15,000km and 24 months, I decided to check on my Citra's timing belt tension to ensure peak performance. As the intake valve CVVT is driven via the exhaust valve CAM, it is imperative the tension is properly adjusted or there will be a discrepancy between the actual timing and the "readout" at the intake timing cam sensor, leading to incorrect CVVT setting by the ECU (TDC vs actual CVVT setting).
Before removing the timing belt cover, make sure the engine is cleaned of all dirt, especially sand. Any dirt falling into the lower parts will eat into the timing belt gear spaces (ouch!). Refer to my earlier blog on engine wash guidelines.
This is an overall view of the upper-half of the timing belt after the top cover has been removed. Noticed that it is a single-pulley but twin cam engine. The intake CVVT is driven by a chain drive located at the rear of the exhaust CAM (refer to my attached video).
The timing belt cover can be removed "as-is", without removing any heavy duty stuff, with exception of the power steering hose, which is displaced to make room by removing a 10mm nut (pictured on the left).
Once the cover is removed, the tension of the timing belt can be assessed. Refer to my attached video on checking timing belt tension. The tensioner is located at the lower left.
{{ Videos on CVVT mechanism and checking belt tension }}
Video 1 : Checking for Timing Belt Slack
Video 2 : Adjusting Timing belt tension, CVVT Mechanism System Overview
As per the Hyundai maintenance manual, the std. procedure for timing belt tensioning translated is:
a. Set the valve timing to TDC with the timing marks aligned at the crankshaft pulley and camshaft pulley
b. Release the timing belt tensioner.
c. Rotate the crankshaft pulley to tension the timing belt.
d. Take up the slack in the timing belt by rotating the tensioner against the timing belt.
e. Tighten the tensioner nut to lock the tension.
(( Good luck and enjoy driving the Citra. ))
Monday, February 15, 2010
CARBURETOR REBUILDING
AN OLD SCHOOL MECHANIC'S GUIDE TO TWIN CARB REBUILT. ENJOY :-)
Recently, I decided to service my twin carb., due to unstable idling and poor response at high speeds (>110km/h). What the Prelude can do, I leave it to your imagination. A light car with low suspension riding on 4 wheel independent wishbone suspension (front) and trailing arm (rear). Not to mention the arresting 4 wheel disc brakes that can pull back all the crazy moves in a split second.
Pictured are the twin carbs, with the bottom exposed after removing the bottom cover. The white plastic rectangulars are the floats, which needs to be calibrated ... say every 2 years. My calibration was a little lean last time, so I took the opportunity to correct it today. Notice the 3 peaks which are the intakes for the respective jets : 1-Main Jet (top), 2-Slow running/Idling Jet (left), 3- Load Compensating Jet (bottom). The rubber couplings lead to the intake manifold. The initial set-up was meant for California emission specs, but I simplified the features to enhance the performance.
The first step is always to check for the float jet, which comes with a small filter for particles. This filter can only filter coarse particles. Fine particles can still sneak past this and cause havoc to the idling system if unchecked. Ever seen a car idling rough, engine dead at traffic stops, or RPM tuned to 2000 for "idling" ? That is what I meant. A quick blow with a WD-40 will clear this filter, or soak and agitate in kerosene if there are particles lodged.
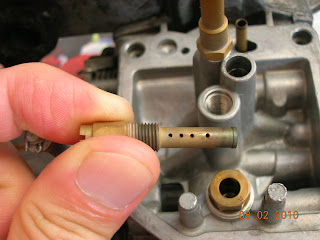
This is the main jet, with holes drilled for air mixture. The main needle of the metering valve goes into this jet body (not pictured). Blockage on this jet is rare, as the hole is large.
Pictured from left are the load compensating jet, idling mixture adjuster needle, slow and idle running jet, idle jet (goes directly to the idling mixture adjuster needle). These are very fine hole jets that must be checked for blockage / partial blockage. As usual, just spray WD-40 into the holes towards the reverse flow end to clear any blockage or check passage way.
The WD-40 method is clearly shown as above, to check or clear internal passage ways for individual circuits (main, slow, idling, load compensation). Acceleration circuit may also be checked using the same method. When spraying into the internal circuit, the throttle must be fully open (full throttle) to observe the flow into the intake passage ways. If the flow is good, job is done
This is a view of the intake passage way, with the idling and slow running holes at the top of the passage way. Double click on the photo to have a clearer view of the idling (1 hole) and slow running holes (3 holes). Squirting WD-40 from the jets will result in output flow from these holes.
The jets have been cleaned and re-assembled, with the floats height calibrated. The mounting surfaces have to be meticulously clean before the float cover is installed or there will be leaks.
The float cover is then cleaned next, and the rubber gasket checked for integrity, flexibility, and tear. No particles is allowed. Cleaning using WD-40 or any other spray lubricant is recommended.
This is the bottom view of the float cover, with a cavity for the load compensating valve. Details later .......
The float cover is mounted, showing the load compensating jet protruding out.
A rubber diaphram is then mounted over the load compensating jet for activation during high load running (uphill, overtaking, high speed runs, etc).
These illustrations are on the bottom-half servicing, and will be complemented with the top-half servicing in the future. The type of carburettor illustrated here is basically a constant velocity carb., meant to improve the torque and power for high performance engines.
Saturday, February 13, 2010
SUNROOF MAINTENANCE
In this section, sunroof maintenance is illustrated so that the owner gets to enjoy the sunroof for many years to come. Proper and scheduled maintenance does make a BIG difference in prolonging the life of the sunroof. Of course, the sunroof can always be rebuilt if it fails to operate, but that is a job that requires an expert not easily found, and fees that is not usually expected. So, it pays to take care of the sunroof now and then.
The photo above shows a new sunroof with attached plastic wrap during installation to prevent scratches on the deflector panel. It has to be removed, or later use will cause the plastic wrap to come loose and may get entangled in the mechanisms.
This is the front mating portion of the sunroof to the chasis It is imperative that this portion is kept clean and free from rust.
A top view of my favorite ride, with the sunroof in a full retracted position.
Notice the accumulation of dirt after hours of fun with the open top. Dirt such as these are often acidic in nature and will eat into the water drain pan if left in a prolonged state.
After carefull cleaning, it looks good as new. When the sunroof was first rebuilt in 2003, I patched up certain spots that were rusted with fibre glass, and painted it over with the special yellow anti-rust paint from Hammerite.
This is a close-up view of the front drain hole located below the sliding mechanism. There will be a total of 4 drain holes for draining water from the sunroof water catchment pan, 2 in front, and 2 at the rear of the pan that is hidden below the chasis roof. This is due to the car body roof that is curved with the apex at the center, and sliding down towards the rear of the car.
Scheduled maintenance should include pouring of soap water into the water catchment pan of the sunroof. This is meant for neutralizing the build up of acidic particles in the drain system, as well as to clear any minor blockages. Of course, this method can be used similarly to check if the drain system is choked up. If it is, the use of compressed air pumped into the drain hole will be the last resort, as the rubber hose may burst if the blockage is serious. Tee soap water should be poured on both front left and right sides, as the drain pan is curved with the apex in the center.
To check the rear drainage system, pour the soap water towards the rear left and right of the sunroof, so as to allow the soap water to flow backwards toward the rear of the water catchment pan.
After each pouring (each of the 4 drain holes), check to see if the soap water flows out at the bottom of the car, at the body silts. If the flow is not progressive, use a mild steel wire to clear any accumulated dirt at the body silt openings. There should be four openings, 2 at each sides of the car. If the flow shows a clean flow of soap water, the job is done right.
Cleaning of the sides of the sunroof opening where the glass panel slides past is imperative to ensure a good seal. Accumulation of dirt will increase friction and reduce the lifespan of the rubber moulding, to the extent of tearing it apart on extreme cases of friction.
Note the accumulation of dirt at the corners.
This is how I do it, with a cottom cloth that is soaked wet with soap water and wrung dry. The soap will neutralize any acidic built up, as well as function as a lubricant for the sliding action of the rubber / furry contact surfaces.
The rear of the sunroof is cleaned by reaching into the cavity to ensure no particles stuck at the sealing surfaces. If there are, water & wind will be leaked into the cabin.
Another shot at the front edge furry sealing surface, after cleaning is done.
Proper maintenance of the sunroof ensures a long lasting usage without any issues. As the sunroof is located at the top of the car, exposure to the sun will accelerate the deterioration, so care is certainly required. Use of "Armour All", or any other rubber protectant is recommended. If there are any details not addressed here, leave a comment, and I will see to it.
And to all chinese viewers ;
Gong Xi Fatt Chai, Wan Sze Ru I, Welcome to the year of the TIGER !
Friday, February 12, 2010
SUNROOF ALIGNMENT : PART 2
This part covers newer designs that incorporate lightweight parts, with advance mechanisms for "Tilt" and "Retract".
The emphasis on water and wind noise leakage I believe, should be at the rear edge, where the tilt and retract actions occur. Since the tail end of the glass panel has to perform 2 functions, therefore the height and gap setting is crucial to prevent leakages. The edges on the glass panel are a furry type of sealing surface mounted on a rubber moulding aroung the glass panel. This type of sealing surface gives good overall dirt absorbtion and resistance to water & wind intrusion into the cabin. Of course, such set-up requires some maintenance (covered under Sunroof Maintenance section), or the sealing ability is compromised.
This is a separate photo shot taken as close-up, showing the gap and height alignment that I did after the new car was taken from the dealer's lot. Initially, the glass panel height was slightly below the chasis roof line, which puts a risk for water leak (allow me to elaborate later). This setting is tested to >110km/h in the heavy rains ( I will not disclose the actual speed, just in case the traffic police is reading this blog ). For safety purposes, use Rain-X on the windscreens to deflect the water to ensure a clear view of the roads, and ensure at least 80% tire tread if such need-for-speed arise. Also note the curvature of the roof line, matched by the glass panel, with the apex at the center.
Another photo shoot of the entire rear glass panel gapping.
This is a view of the sides gapping. The gap is largely determined by the chasis and glass panel fabrication dimensions. Alignment is only limited to ensuring a proper centering during the bolting, or in some cases, the centering alignment is totally flexible with no alignment screws / bolts.
A view of the front gapping and height. As mentioned earlier, The glass panel rubber moulding height must be at least the same height or higher than that of the roof line. This is to ensure water flow AROUND the sunroof rather than over or accumulating on it (if the glass panel is below the roof line). Secondly, the furry seals on the rubber moulding is below the surface, and need to come in contact with the sealing surface of the chasis cavity. Lowering the height of the glass panel thus increases the risk of water accumulation at the gaps and leaking into the water drip pan below. Coupled with speed and stop-go-movement, it will result in spilled water into the cabin. There are also some arguments on "drainage" piping issues that I will address in the "Sunroof Maintenance" section, as the drainage issues can be easily checked and be verified.
This photo shows the side view of the "Tilt" and "Retract" mechanisms, that can be readily seen without removing any cover panels. Pictured is the "rest" position of the sunroof (closed position). Note the round stub close to the spotlighted area. This is the index for raising the sunroof for tilt and lowering the sunroof for retraction mode.
Pictured is the round stub at the "retraction" mode. This position of the stub lowers the glass panel for retraction into the cavity between the chasis roof and headliner.
Pictured is the sunroof at the "Tilt" mode, with the round stub and arm at the raised position (spotlighted area). Retraction mode will be in the opposite direction movement of the round stub.
This is the exterior view of the "Tilt" mode so there is no confusion as to what it does. OK so far ??
Pictured is a view of the mechanism. Note the rear adjustment bolt (in blue) that is meant for final stop height for the glass panel rear end (driver side).
A more detailed view of the same bolt from outside of the car, as we will be focusing more on the details of glass panel height adjustment.
In the above illustration, all 3 adjustment bolts are shown (on a single side). The rear screw, as introduced earlier, enables a final stop height adjustment on the respective sides (passenger and driver sides). Double-click on the image to enlarge to full screen for a clearer view if you have broadband access. Similarly, the front two screws, allows final stop height adjustments for the respective sides at the front end of the glass panel. It is therefore commonsense that the adjustments are to be done at the final stop position, with a #2 philips screwdriver (with powergrip), or a racheting drive for better torque. These screws are to be tight as they will be subjected to wind force. As the hinges are rigidly attached to the glass panel frame, the only way to adjust for side alignment gapping is probably to bend the hinges .... but this is not recommended. Do investigate on and eliminate on other possible causes for lateral misalignment before resorting to this brute force method.
Finally, if you do come across any issues that is not covered in this blog, do post me an enquiry. I will do my best to assist :-)
Subscribe to:
Posts (Atom)